Crisis Core Final Fantasy VII Reunion Trophy Guide & Roadmap
FAQs
Is Crisis Core Final Fantasy VII Reunion before the Final Fantasy VII Remake (2020)?
Yes, this is a prequel to FF7. The story takes place before the FF7 Remake and introduces some new characters like Zack and Angeal.
How long does it take to complete Crisis Core?
It will take the average player around 8-10 hours to complete the main story. It will take less if you skip cutscenes and don’t do any optional missions.
Is Crisis Core Final Fantasy VII Reunion a remaster or remake?
This game is a remaster of the original PSP game Crisis Core from 2007. Every scene got the make-over treatment and looks superb. They changed a few things like the combat and summon cinematics.
How does Crisis Core combat work?
Crisis Core uses a real-time battle system -not turn-based like earlier titles. You can move around, attack, block, cast materia, initiate special abilities, use items and more. One of unique features in Crisis Core are the DMW (Digital-Mind-Wave). It’s a spinning wheel in the top-left corner which are active during combat – it grants the player different status effects and special attacks, limit breaks and summons.
Roadmap
- Offline Trophies: 51 (1
 , 3
, 3 , 5
, 5 , 42
, 42 )
) - Hardest Trophies: Divine Rule Broken & Shinra’s Squats Champion
- Does difficulty affect trophies?: Yes – Luckily, beating just the final boss on Hard difficulty unlocks the trophy SOLDIER of Legend (you can change difficulty via the pause menu).
STEP 1: NORMAL DIFFICULTY PLAYTHROUGH + EVERY MISSABLE COLLECTIBLE & TROPHY [8-10 HOURS]
Follow The Collectibles Guide for your playthrough – it´s your companion guide for getting all missable Collectibles and Trophies. There are a lot of Collectibles in the game, but luckily only a few are actually missable. The Collectibles Guide also show you how to get the missable chapter-specific Trophies. Everything is listed in chronological order.
Play through the game while following the Collectibles Guide. Play up until Chapter 10 (which is the last Chapter) and the very last Save Point in the game. There will be a bright white light, and the game prompts you with a menu, asking if you want to continue – this is right beside the final Save Point.
Trophies earned during this step:
- Embrace Your Dreams
- He Wouldn’t Betray Us
- We´re Not Monsters
- Angels Dream of One Thing
- Where Did Everyone Go?
- Protect Your SOLDIER Honor
- Did Genesis Really Die?
- I May Abandon Shinra
- I’ll Come Visit
- We’ll All Be Heroes
- Thanks to You, Zack
- Come and Get It
- Prove Your Honor to Me
- Got Materia Fusion Down
- Hero of the Wutai War?
- Master Mako Stone Miner
- Banora Treasures
- Slicin’ SOLDIER
- First-Rate SOLDIER
- Godlike
- Master Blender
- BINGO!
- Good Match For Aerith
- Precise Restoration
- Of Significant Worth
- Cell Raider
- Shinra’s Squats Champion
- Wutai’s Nemesis
- Master Infiltrator
- Immovable Object
- Fan Club Savior
- Fan Club Aficienado
- Midgar Full of Flowers
- Seven Wonders Expert
- Zack The Sniper
- Waterfall Chaser
- Cage Opener
MISSABLE WARNING: Like it’s mentioned above, everything is missable! If you miss a Chapters-specific trophy you have to play through the whole game again. Every time you complete a Chapter, the game prompts you with a save option – save at least once for every Chapter, this way you don’t have to go all the way back to the start of the game, IF you miss anything.
STEP 2: COMPLETE SOME MISSIONS + 100% DMW PROGRESS [2-5 HOURS – LUCK-BASED]
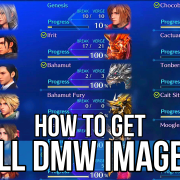
This next step involves completing most of the missions. While completing misssions, you automatically get progress towards your 100% in the DMW. Refer to the DMW Image Locations Guide to earn all the different images. Some of the images are earned in some high-level missions, that is why you need complete most of the missions while working towards the images. You will raise in level and earn some new materia which will help you complete them.
Recommended materia and upgrades (materia fusion):
- Costly Punch – It can 1-hit many enemies and deal 99,999 dmg with the right equipment – there are multiple ways to break the damage barrier. You can create Costly Punch by fusing Goblin Punch (reward for earning the trophy Waterfall Chaser in Chapter 9) with any purple materia from the QMC+ Shop (also unlocked in Chapter 9).
- Jump materia – This can be better than Costly Punch during the earlier missions. Jump is an AOE (area-of-effect) attack which hits multiple enemies. This helped me to complete about half of all missions as quickly as possible. Many encounters are over after a single use of Jump.
- Cure/Cura/Curaga – Used to heal Zack. Curaga is the strongest verison and heals you the most.
- Other than that, use anything that you like! Just remeber to fuse materia to increase your percentages in health and other usable stats. I recommend focusing on increasing your VIT and SPR stats – they are essential in step 3 of the roadmap and defeating the boss Minerva.
NOTE: Always enter Buster Sword Stance (SQUARE + X) before using Costly Punch or Jump – it will increase your damage.
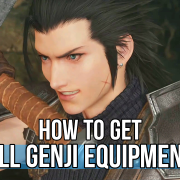
When you have collected all DMW images, refer to the 100% DMW Guide (AFK Farming Method). Getting DMW progress to 100% unlocks the Genji Armor. It´s part of a trophy in step 3, but it will also help you complete the last missions. The Genji Armor increases your health limit to 99,999 amd grants Endure and Regen status effects.
Trophies earned during this step:
STEP 3: COMPLETE ALL MISSIONS + MINERVA SUPERBOSS [8-10 HOURS]
Now you want to complete the last of the missions, beside M.9-6-6 which is the Minerva boss fight. Keep an eye out for the last pieces of Genji Equipment. Completing all missions (beside M.9-6-6) will give you a lot of materials for materia fusion. Take a look on the Minerva Boss Guide for the list of materia you want to use and upgrade.
You earn the last collectibles during this step. The last Mail Senders and Shops are automatically unlocked when you complete the last missions. See the Collectibles Guide for the list of remaining Collectibles.
Trophies earned during this step:
- Missions Completed: 75%
- Mission Completionist
- Shop Completionist
- Mail Completionist
- Genji Equipment
- Divine Rule Broken
STEP 4: FINAL BOSS ON HARD DIFFICULTY [30-60 MIN.]
When you have defeated Minerva, change your difficulty to Hard from the Pause Menu. Defeating just the final boss on Hard, unlocks the trophy for beating the whole game. Note that this may be a bug and CAN be patched in the future.
Trophies earned during this step:
Related Crisis Core Final Fantasy VII Reunion Guides:
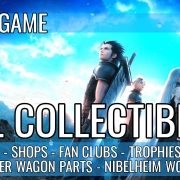
- Crisis Core Final Fantasy VII Reunion – All Collectibles Guide
- Crisis Core Final Fantasy VII Reunion – How To Get All Genji Equipment
- Crisis Core Final Fantasy VII Reunion – Minerva Boss Guide
- Crisis Core Final Fantasy VII Reunion – All DMW Image Locations Guide
- Crisis Core Final Fantasy VII Reunion – 100% DMW Guide (AFK Farming Method)
Trophy Guide
My Living Legacy
Acquired all trophies.

Earn every trophy in Crisis Core Final Fantasy VII to unlock the Platinum.
Embrace Your Dreams
Cleared the Prologue.

Automatic story-related trophy, cannot be missed.
He Wouldn’t Betray Us
Cleared Chapter 1.
Automatic story-related trophy, cannot be missed.
We’re Not Monsters
Cleared Chapter 2.
Automatic story-related trophy, cannot be missed.
Angels Dream of One Thing
Cleared Chapter 3.
Automatic story-related trophy, cannot be missed.

Where Did Everyone Go?
Cleared Chapter 4.
Automatic story-related trophy, cannot be missed.
Protect Your SOLDIER Honor
Cleared Chapter 5.
Automatic story-related trophy, cannot be missed.
Did Genesis Really Die?
Cleared Chapter 6.
Automatic story-related trophy, cannot be missed.
I May Abandon Shinra
Cleared Chapter 7.
Automatic story-related trophy, cannot be missed.
I’ll Come Visit
Cleared Chapter 8.
Automatic story-related trophy, cannot be missed.
We’ll All Be Heroes
Cleared Chapter 9.
Automatic story-related trophy, cannot be missed.
Thanks to You, Zack
Cleared Chapter 10.

Automatic story-related trophy, cannot be missed.

Come and Get It
Won a battle for the first time.
Automatic story-related trophy, cannot be missed. This will be your very first trophy. After the first cutscene of the game, you will be fighting a group of enemies – defeating all of them triggers the next story cutscene and earns you the trophy.

Prove Your Honor to Me
Performed a limit break for the first time.
Automatic story-related trophy, cannot be missed. You will automatically enter Limit Break when fighting enemies – Limit Break is activated when 3 identical images line up in the DMW (The spinning object in the upper-left corner). This will be one of your very first trophies.

Got Materia Fusion Down
Performed materia fusion for the first time.
Automatic story-related trophy, cannot be missed. You unlock Materia Fusion in Chapter 3. Press OPTIONS > Materia Fusion > Fuse any 2 materia to unlock the trophy. There will be a little tutorial guiding you through it.
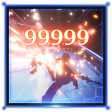
Overpowered
Dealt 99,999 damage to an enemy.
Your max damage output is 9,999 by default. You need to break the damage barrier in order to do 99,999 damage with one attack – there are multiple ways to achieve this.
- 1st option – In Chapter 6 you unlock something called Buster Sword Stance. Increasing the Proficiency to 25% breaks the damage limit. Defeating enemies while in Buster Sword Stance increases proficiency. The benefit of using this stance is taht your next attack deals increased damage.
- 2nd option – Equip any accessory that breaks your damage limit. One of the earliest accessories you can get, that increase your damage limit to 99,999 is the “Brutal” accessory. The accessory is earned by completing Mission 7-4-6 or 9-5-1. You can also find the accessory in a chest in M9-6-3.
Next step is to actually deal 99,999. I highly recommend that you use the Costly Punch materia – it’s the same materia you will use for the Minerva Superboss near the end of the game.
You can get the Costly Punch materia at the earliest in Chapter 9. You need to craft the materia following this method.
When you reach Gongage, after a cutscene with Cissnei, turn around and open a chest to find the QMC+ Shop. Next you want the Goblin Punch materia earned by completing the waterfall minigame (See Waterfall Chaser on how to complete the minigame).
With both the Shop and materia unlocked – buy any purple DMW materia from the QMC+ Shop and fuse it with Goblin Punch, this will give you the Costly Punch.
When your stats get hgher as you level up and fuse materia, you’ll end up damaging 99,999 without even trying. Note that damaging enmies from behind will increase your damage even more.
Limit Break Collector
Obtained all DMW images.
There are a total of 18 DMW images to collect. Luckily only one of the images are missable. Rest of the images are unlocked by playing just the story (automatically unlocked) or by completing missions.
>Crisis Core Final Fantasy VII Reunion – All DMW Image Locations Guide.
DMW Master
Achieved 100% progress for all DMW.
Before you can earn this trophy, you need to collect all 18 DMW images – see Limit Break Collector on how to collect them all. After finding every image, refer to the guide below.
>Crisis Core Final Fantasy VII Reunion – 100% DMW Guide (AFK Farming Method)
The guide will give you the best way to farm flashback scenes and earn 100% DMW progress as quickly as possible.
Missions Completed: 25%
Completed 25% of all missions.
Missions Completed: 50%
Completed 50% of all missions.
Missions Completed: 75%
Completed 75% of all missions.

Mission Completionist
Completed 100% of all missions.

You will unlock all missable missions by following the Crisis Core Final Fantasy VII Reunion All Collectibles Guide.
I recommend leaving most of the missions for the end-game. You can complete half or more of the missions in about 1 minute, when you’re just a bit overpowered. This makes the process a bit more bearable.

Shop Completionist
Unlocked all shops.
You will get this by following the Crisis Core Final Fantasy VII Reunion All Collectibles Guide.
List of Shops and how to unlock them:
- Research Dept. QMC+ (found in a chest in Chapoter 9)
- Gongaga Trading (M2-3-1)
- Juno Souvenirs (M2-4-1)
- Myhtril Mine Traders (M2-4-5)
- Wutai Secret Shop (M4-2-6)
- The Happy Turtle (M4-3-6)
- Sec.7 Shop (M4-4-3)
- Sec.8 Materia Shop (M6-2-1)
- Sec.5 Materia Shop (M6-2-3)
- Sec.6 Accessory Shop (M6-2-6)
- Nibel Accessories (M6-4-4)
- Bone Village Outlet (M7-5-3)
- Online Shop Duo (M9-3-3)
- Online Shop Shade (M9-5-4)

Mail Completionist
Received mail from all senders.
You will get this by following the Crisis Core Final Fantasy VII Reunion All Collectibles Guide.
You only need to recieve 1 Mail per Sender to earn this trophy. There are only 6 missable Mail Senders. 5 of them are from the 5 Fan Clubs (which are tied to another trophy), and the last Mail Sender is the Reporter on the street in Midgar (choose NOT to report him).

Genji Equipment
Collected all Genji equipment.
> Crisis Core Final Fantasy VII Reunion – How To Get All Genji Equipment
Hero of the Wutai War?
Received highest evaluation from Lazard for Assault on Fort Tamblin.
CHAPTER 1
After the “Mt. Tamblin – Mountain Path” Save Point, you storm Fort Tamblin. You’ll see a box appear in the upper-left corner. Here you can see how many enemy forces you have defeated in the area. You need to defeat all enemies before you leave the area. If you open the map, you can see some of the enemy locations. A few of the enemies enemies only spawn when you interact with a watchtower or some of the rotating walls. There are 2 enemies in and watchtowers and 3 enemies hiding behind the rotating walls.
Make sure that all 16 enemy encounters have green checkmarks in the upper-left corner, before you leave through the gate and continue to the next area.
The trophy unlocks later in the chapter. When you have completed the boss fight, you meet up with Lazard and he’ll evaluate you. If you defeated all the enemies you get the highest evaluation and the trophy.
Fan Club Aficionado
Joined every fan club.
You will get this by following the Crisis Core Final Fantasy VII Reunion All Collectibles Guide.
Master Mako Stone Miner
Prevented the Materia Room from being shut down.
CHAPTER 2 (Can be earned up until Chapter 7)
This trophy is obtainable between Chapter 2 and the point of no return in Chapter 7. You need to unlock and complete 6 missions for a researcher in the Shinra Building.
From the start of the Chapter, don’t talk to Tseng (this will trigger the next story segment), instead leave the area to trigger a little cutscene. You will be transported to Midgar Streets by the fountain. Go back into the Shinra Building, head to the elevator and select the SOLDIER Floor. Next you want to enter the Materia Room (the text is written on the door), it´s located left of a Save Point.
Talk to a Researcher to unlock the missions M8-2-1 through M8-2-6. Complete all 6 missions, this can be done from any Save Point. Completing all missions will reward you with Mako Stones. Give all the Stones to the Researcher to unlock the trophy.
If the missions are to difficult to complete, you can wait up until Chapter 7 to complete them.
Banora Treasures
Collected all items and arrived at Angeal’s house before the Banora airstrike.
CHAPTER 2
After you talk to Tseng in the Shinra Building, you’ll find yourself in Banora. After meeting with Angeal’s mother, you get the objective to meet up with Tseng at the factory. Before meeting up with Tseng, you need to interact with 5 glowing items lying around the area. There are 3 located close together in the village, and 2 located on the way up the hil to meet with Tseng. Interacting with them makes the available to you later in the Chapter.
After the Shells minigame (Slicin’ SOLDIER) you get a call from Tseng. You will get 45 seconds to head back to Angeal’s mother. On the way, you need to collect all 5 glowing items (2 on the hill and 3 in the village). Collecting all 5 will earn you the trophy when you reach the house, before the timer runs out.
Everyone’s Hero
Saved everyone calling for help during the assault on the Shinra Building in Chapter 3.
CHAPTER 3
This trophy takes place after you go to the Director’s Room to talk to Lazard. An alarm will go off and the whole building will be under attack. When you are riding the elevator down, be sure to choose “Get off and look around.” You will find yourself on the SOLDIER floor. There are 3 NPC’s you need to save. 1 as soon as you get off the elevator, 1 lying on the ground to the left, and a pair of NPC’s in the Materia Room.
Head back to the elevator and complete the next 2 story-related fights. After a cutscene where you’re introduced to Cissnei, you will find a NPC to your left and 1 to your right in the LOVELESS Avenue destrict.
Saving all 5 groups of NPC’s earns you the trophy.
First-Rate SOLDIER
Defeated all virtual data in the Training Room.
CHAPTER 3
Right at the start of Chapter 3, head to the Training Room on the SOLDIER Floor (Shinra Building). Talk to Hojo and complete all 4 virtual fights to unlock the trophy. They are all super simple and quick to complete. The only one that can be a bit annoying is the last fight. Just play it safe and heal with Cure whenever you are low on health.
Precise Restoration
Achieved 100% recovery with the Mako Recovery Unit.
CHAPTER 4
After leaving the Slums, you will follow a highway and end up in the Shinra Building with Hojo. To his left you’ll see a console you can interact with. The console will count down from 5 and hide the number on the screen when it reaches 3. Continue counting down by yourself and press X as soon as you reach 0. It can take a couple of tries to get the timing right, but you can keep trying as many times as you want.
Of Significant Worth
Judged by Hojo to be a “SOLDIER member of significant worth” in the Fusion Chamber.
CHAPTER 4
After leaving the Slums, you will follow a highway and end up in the Shinra Building with Hojo. You can see a big blue champer in between two consoles, this is the Fusion Chamber. Enter the chamber to start a little minigame. Hojo will ask you a series of questions, choosing the dialogue listed below will earn earn you the trophy.
- A SOLDIER operative like Sephiroth
- State-of-the-art science and technology
- A person unafraid to challenge Shinra

Cell Raider
Checked all cells on the 67th floor of the Shinra Building.
CHAPTER 4
After leaving the Slums, you will follow a highway and end up in the Shinra Building with Hojo. There will be a console to the right of the Fusion Chamber. Before you interact with the console, equip the “steal” materia (Bruno gives it to you earlier in the Chapter). You need to steal 6 keys from 6 enemies, enter the 6 cells (using the keys) and open 3 chest in each cell (18 chests total) and return to Hojo before the timer runs out.
Wutai’s Nemesis
Caught all the Wutai spies that had infiltrated Midgar.
CHAPTER 5
Head to the LOVELESS Avenue in Sector 8. Find and talk to a SOLDIER 2nd Class, agree to help him find the Wutai spies. To reveal a spy, you need to talk to the character 3 times – this will reveal there true identity. The order of which you need to find them are fixed. Here’s the list:
- Man in front of the LOVELESS Avenue Theater.
- Shinra Trooper in Sector 5 Market. He is walking around the area.
- Male Shinra employee. Located upstairs by the elevators in the Shinra Building Entrance. Run up and down the stairs to make the spy spawn.
- Woman talking to a man in the Fountain area. She is located right by the entrance to the Sector 1 Train Station.
- Shinra Employee in the Exhibit Room. He’s standing by the big rocket.
- Little kid running around the Park in the Sector 6 Slums. The kid wears a hat.
Fan Club Savior
Helped every fan club continue their activities.
CHAPTER 7
There are a few steps to earn this trophy – they are as follows:
- Talk to Genesis Fan by the fountain – Choose: “Merge with a rich Fan Club!”
- Talk to other Fan in LOVELESS Avenue.
- Talk the first Fan again.
- Talk to the boy running around near the first Fan.
- Find and talk to his mother on the Sector 1 Platform.

Midgar Full of Flowers
Constructed every flower wagon type.
You will get this by following the Crisis Core Final Fantasy VII Reunion All Collectibles Guide.
Seven Wonders Expert
Learned about all of Nibelheim’s Seven Wonders.
CHAPTER 8 & 9
You will get this by following the Crisis Core Final Fantasy VII Reunion All Collectibles Guide.
Cage Opener
Opened the path to the Cage of Binding.
CHAPTER 10
This trophy can be earned near the start of Chapter 10. You need to interact with 4 gravestone-looking tablets and defeat 5 specific enemies. The first tablet is looking where you enter the Dephts of Judgement, you will see it right by the Save Point. The last 3 can be found in Portal of Severance, Howling Fang and right beside the entrance to the Lake of Oblivion.
After interacting with all 4 tablets, enter the Lake of Oblivion – here you will find 5 Mako Springs (they look like crystals hanging from the ceiling). Interact with a Mako Spring to spawn an enemy. Defeat all 5 enemies spawned from each of the springs to open the Cage of Binding.
Slicin’ SOLDIER
Cut down every incoming shell.
CHAPTER 2
This trophy can be earned in Chapter 2, after being to factory with Tseng. There will be a little tutorial on how to complete the minigame. Whenever the reticle on the shell turns blue, press SQUARE to slice them. You need to hit all 10 without missing to earn the trophy.
If you miss a shell, reload your latest auto-save to try again (you have to complete the minigame to reload the auto- save).
Master Blender
Blended a perfume with the perfect amount of oil.
CHAPTER 4
This trophy takes place in the Sector 5 Slums Market area, after getting your wallet back. Interact with the “Shopping Paradise” store to start this minigame. You need to count the correct number of oil drops needed to craft a perfect perfume.
- Drip = 1 drop
- DripDrip = 2 drops
- Splash! = 10 drops
When the correct number has been reached – press X. There is a Save Point beside the shop. I recommend backing up your save before attempting this. You need to complete this minigame 3 times, without failing, for another trophy – See Good Match For Aerith for more info.
Bingo!
Guessed the exact number in the number-guessing game.
CHAPTER 4
This trophy takes place in the Sector 5 Slums Market area, after getting your wallet back. Talk to a lone boy standing in the corner. This will start the number-guessing minigame. Aerith will mention 2-3 numbers, and then you have to pay the boy 50 gil for him to mention 3 more numbers. Now, the trick to finding the correct number is to compare Aerith’s and the boy’s numbers. The number that is mentioned twice is the correct one.
Example: Aerith mentions 1, 2 and 3. The boy mentions 2, 5 and 6 – the correct number is 2 because it’s mentioned by both.
Godlike
Rated to have “godlike speed” in collecting materia.
CHAPTER 4
This trophy takes place in the Sector 5 Slums Market area. After getting your wallet back, head over to the store with the “Item World” sign to start this minigame. You need to collect 20 pieces of materia under 14 seconds. Press L3 to sprint and spam X to pick up all the materia along the way. When the Shopkeeper rates you with “godlike speed” – you earn the trophy. Retry the minigame if you failed to complete it under 14 seconds.
Shinra’s Squats Champion
Achieved victory against the SOLDIER 2nd Class in the physical fitness test.
CHAPTER 5
At the start of the Chapter, head to the Training Room and talk to the man present – this starts the squat minigame. You need to beat the first 4 opponents for the trophy. You have to press TRIANGLE when Zack’s hands are behind him to perform a squat.
The reason why this is one of the hardest trophies, is because of the timing for performing a successful squat. After a series of successful squats, Zack speeds up, this makes the timing different from the previous set of squats. There are a total of 4 different speeds of which he performs his squats. This will take a couple of tries, but just keep trying – the more you try the more you learn the pattern.
Note: turn on controller vibration to help with the timing – this will give you a little cue for the right timing.

Master Infiltrator
Infiltrated the mako excavation facility without being discovered once.
CHAPTER 5
You will reach a snowy mountain area as part of the story. You need to infiltrate a facility without getting spotted. Before you attempt it, make a backup save at the Save Point right next to the facility. You reach the facility right after a cutscene with Tseng and the Shinra Trooper.
You will see a couple of blue zones when you infiltrate the facility – enter the zone and use L1 to crouch and hide from the patrolling guards. If you get spotted before entering the facility, reload your backup save to try again.
Immovable Object
Defeated all enemies in Defense of the Junon Perimeter.
CHAPTER 6
When you’re chasing down Hollander, you reach a story-related minigame where you need to defend the area and keep enemies from reaching a gate. There are a total of 30 enemies you need to defeat. Run side to side on the road to engage combat encounters with incoming enemies. I recommend staying near the ned of the road – this will give you more time to react and stop the incoming enemies.

Zack the Sniper
Did not allow a single gun bull head to escape while sniping.
CHAPTER 9
When you’re leaving Nibelheim, you will find sniper rifles laying on the path to the next objective. You have to pick up the sniper at all 8 sniper spots (some are hidden away from the main path), and defeat all gun bull head enemies – if 1 escape, you have to reload your last autosave and start all over.
There is a method to make it alot easier. After the 3rd sniping spot, run back and forward to encouner more enemies. Farm as many kill points as you like and use them on the next sniping spot to upgrade it’s damage. The upgrades are shared between every sniper spot. The more points you farm, the more upgrades you can buy and give yourself a good chance of successfully completing all 8 sniping spots on your first try. It’s not necessary to fully upgrade the sniper.
The trophy unlocks when you reach the next Save Point, located a bit further ahead after the last sniping spot.
Waterfall Chaser
Collected ten chests coming down the waterfall in the hills of Gongaga.
CHAPTER 9
After a cutscene with Genesis in Gongaga, you’ll find yourself on a map called “Hills.” Run around the area and complete 7 random combat encounters. Now, when you try to leave the area, you get the chance to complete the waterfall minigame. You have to collect 10 chests falling down the waterfall, while dodging the monsters. The chests follow the same pattern:
Center > left > right > center > left > right > center > left > right > center – Trophy unlocked.
If you get hit by a monster or miss a chest, you have to leave the area, come back, and complete 7 random combat encounters to triger the minigame again.

Good Match For Aerith
Told by Bruno that you and Aerith “make a good couple.”
CHAPTER 4
For this trophy, you need to get a high affection level with Aerith before you leave the Sector 5 Slums. Here’s an overview of all the steps:
- Make sure that you have 5 potions in your inventory before entering the Sector 5 Market (Buy 5 from a Shop using the pause menu). We need to trade them in a later step.
- Talk to the 3 different shops around the Market. (+10 affection)
- Find the little girl standing by some crates, talk to her and choose: “Wait a little longer” for a total of 10 times.
- Trade 5 potions to the little boy standing on the opposite side of the Market. (+10 affection)
- When you get a cutscene with Aerith and the thief – select the 2nd dialogue option: “I’ll buy the medicine for you.” (+10 affection)
- Get your wallet back from the monsters.
- Head over to the store with the “Item World” sign and talk to the man to start a minigame. You need to collect 20 pieces of materia under 14 seconds. Press L3 to sprint and spam X to pick up all the materia along the way. When the Shopkeeper rates you with “godlike speed.” (+5 affection)
- Interact with the “Shopping Paradise” store to start this minigame. You need to count the correct number of oil drops needed to craft a perfect perfume. When the correct number has been reached, press X. There is a Save Point beside the shop. I recommend backing up your save before attempting this. NOTE: If you fail you LOSE points with Aerith! Succesfully make 3 perfect perfumes without failing. (+15 affection)
When you leave the Slums (as part of the story), Bruno will stop you. He’ll say that you and Aerith will “make a great couple.” If he says “good couple,” then you missed something above or made a bad perfume.
Divine Rule Broken
Defeated Minerva.
> Crisis Core Final Fantasy VII Reunion – Minerva Boss Guide
SOLDIER of Legend
Cleared the game in Hard Mode.
There is a wuick and easy way to earn this trophy – simply change the difficulty to Hard before the final boss. Defeating the final boss on Hard difficulty is enough to earn the trophy. This may be a bug and can be patched in the future. To change the difficulty – open the pause menu, go to Options > Gameplay Settings > Difficulty > Hard.
I recommend doing this after completing all 300 missions and defeating Minerva – this wil make the final boss a walk in the park.